Saturday, July 17, 2010

Love the Carnival? Try These Caramel Apple Oatmeal Cookies

I made these cookies awhile back, and thought I would share them with you.  Kind of a new take on an oatmeal raisin cookie.  I love the mixture of caramel and apple, and if you get them out of the oven quickly, they end up really chewy.  I will warn you, you will want to eat them all when you make them.  So make sure that you have somewhere to take them or people to serve them to.  My camera was broken when I made them so I don't have a picture of the ones I made, but the recipe came out of the March 2010 Cooking Light magazine.  The picture posted below is also from the magazine.  


The recipe calls for caramel bits or chunks of caramels.  I found the caramel bits at SuperTarget.  I haven't seen them anywhere else.  I just did not want to have to cut up sticky caramels.  One bag is enough for two or three recipes.  


Caramel Apple Oatmeal Cookies


1 1/2 cups all-purpose flour
1 1/2 cups old-fashioned rolled oats
1 teaspoon baking powder
1/2 teaspoon baking soda
1/2 teaspoon salt
3/4 cup granulated sugar
3/4 cup packed brown sugar
6 tablespoons unsalted butter, softened
2 teaspoons vanilla extract
1 large egg
3/4 cup finely chopped dried apple slices
3/4 cup caramel bits or 16 small soft caramel candies, chopped

1. Preheat oven to 350°.


2. Weigh or lightly spoon flour into dry measuring cups; level with a knife. Combine flour and next 4 ingredients (through salt) in a bowl; stir well.


3. Place sugars and butter in a large bowl; beat with a mixer at medium speed until light and fluffy. Add vanilla and egg; beat well. Gradually add flour mixture; beat at low speed until just combined. Fold in apple and caramel bits.


4. Drop dough by 2 teaspoonfuls 2 inches apart onto baking sheets lined with parchment paper. Flatten balls slightly with hand. Bake at 350° for 9 minutes. Cool on pans 3 minutes. Remove cookies from pans; cool completely on wire racks.

Saturday, July 10, 2010

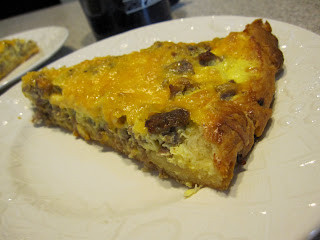
Who Says You Can't Have Pizza for Breakfast?

Good Morning everyone! For some reason I have been craving breakfast pizza, so last week, my wonderful husband made one for us. He's had to play Mr. Mom while I am on bed rest with the twins.  He is a fantastic cook, and an expert griller.  I will try to post some of his grill secrets if he will share them.

I remember one of my student's moms sent a pizza in for class and it was sooooooooooo good, so we found a recipe from Cooking Light that worked for us. Now, I can't take any credit other than searching for an online recipe. Ken made the whole thing. You could definitely jazz it up a bit by adding southwest veggies and different cheese, or spinach and mushrooms. Whatever suits your fancy would totally work! The base recipe we used is below, hope you enjoy!

**Just a side note -- be sure you use a pan deep enough to hold the liquid egg mixture.  You don't want it spilling over to the bottom of your oven.  Ours ran over a bit and the next time we used the oven we smoked out the house!!

Breakfast Pizza


1 (8-ounce) can reduced-fat refrigerated crescent dinner roll dough
Cooking spray
12 ounces turkey breakfast sausage
1 cup frozen shredded hash brown potatoes, thawed
1 cup (4 ounces) shredded fat-free cheddar cheese
1/4 cup fat-free milk
1/2 teaspoon salt
1/8 teaspoon black pepper
1 (8-ounce) carton egg substitute
2 tablespoons grated fresh Parmesan cheese

Preheat oven to 375°.


Separate dough into triangles. Press triangles together to form a single round crust on a 12-inch pizza pan coated with cooking spray. Crimp edges of dough with fingers to form a rim.


Cook sausage in a large nonstick skillet over medium heat until browned, stirring to crumble. Drain.
Top prepared dough with sausage, potatoes, and cheese. Combine milk, salt, pepper, and egg substitute, stirring with a whisk. Carefully pour milk mixture over sausage mixture. Sprinkle with Parmesan. Bake at 375° for 25 minutes or until crust is browned.

Posted by Picasa

Thursday, July 1, 2010

Easy and Delicious Chicken Pot Pie

Don't ask me why, but Chicken Pot Pie has always been a favorite of mine.  When I realized that most recipes are cream of ??? and milk, it kind of grossed me out.  Not to say that I never use canned soup, but I do try to stay away from it.  This recipe was different and super easy.  I mean super easy.  Your kids are sure to eat it.  Throw in their favorite veggies and serve with a side salad.  This recipe is also from Real Simple magazine, April 2010 issue.

Way Easy Chicken Pot Pie


Ingredients
  • 1 rotisserie chicken (2 to 2 1/2 pounds), meat shredded
  • 2 14.5-ounce cans corn chowder (Wolfgang Puck Brand is suggested)
  • 1 cup frozen peas
  • 1 cup frozen corn kernels
  • 2 teaspoons fresh thyme leaves
  • kosher salt and black pepper
  • 1 sheet frozen puff pastry (from a 17.3-ounce package), thawed
Directions
1. Heat oven to 400° F. In a large bowl, combine the chicken, corn chowder, peas, corn, thyme, and ¼ teaspoon each salt and pepper. Transfer the mixture to a shallow 2-quart (or 8-inch square) baking dish.
2. Lay the pastry on top of the dish, trim to fit, and cut vents in the top.
3. Bake until the chicken mixture is bubbling and the pastry is golden brown, 25 to 30 minutes.
So good and simple.  Definitely a comfort food, but hey, you can do that every once in a awhile!  You will impress your family with this one!  

Wednesday, June 23, 2010

Easy Granola

OK, so I really do have a good excuse for not blogging much at the beginning of the year.  I am expecting twins this fall, so I have been juggling my sweet 2 and a half year old girl, feeling sick, and taking care of the house.  I do have some great recipes to post, and will hopefully get that done soon.  Now, they have me on bed rest, so I should be able to get some things posted.  My camera has been broken so I might not have pictures, but I will try to get something up.  Who knows, I might just have to blog about things other than recipes.

This recipe, is so so good.  Sometimes there is something to be said for simplicity.  I have made all sorts of granolas in the past, but this one far outweighs them all.  Best of all, it is the easiest of them all.  This holds up well in milk and has a really rich taste.  I found the recipe in Real Simple magazine the April 2010 edition.  The picture taken is from the magazine as well.  Let me know if you try it!


Ingredients
  • 4 cups old-fashioned rolled oats (not quick cooking)
  • 1 cup sliced almonds
  • 1/2 cup shredded coconut (preferably unsweetened)
  • 1/4 cup unsalted pepitas (hulled pumpkin seeds) or shelled sunflower seeds
  • 1/2 cup pure maple syrup
  • 2 tablespoons canola oil
  • 1/2 teaspoon kosher salt
  • 1 cup dried fruit (such as cherries, cranberries, raisins, or currants)
Directions
1. Heat oven to 350° F. On a rimmed baking sheet, toss the oats, almonds, coconut, and pepitas with the maple syrup, oil, and salt.
2. Bake, tossing once, until golden and crisp, 25 to 30 minutes.
3. Add the dried fruit and toss to combine. Let cool.
Tip
The granola will keep in an airtight container in a cool, dry place for up to 3 weeks.

Sunday, March 14, 2010

Perfect Pot Roast

I have meant to make this post awhile ago, but better late than never, right?  This recipe was introduced to me from my dear friend Julie.  It is found in a cookbook from Fellowship Bible Church.  So simple, amazingly simple, but the best pot roast you will ever have.  I hope your family enjoys it as much as we do.  When I cook it I put it in the crock pot, but you can also cook it in the oven as well.  I will include both instructions.  The picture doesn't do it justice and the biscuits in the picture are cheddar biscuits, I will post that recipe separately.  This recipe works very well if you are taking a meal to another family because it feeds a lot.  It is also perfect to put in the oven early on Sunday morning and then lunch is dinner right after church!

Perfect Pot Roast


Ingredients:
Pot Roast
1/4 cup Dale's Seasoning
2 cups Water
Any stew vegetables that you enjoy.  I use carrots, small potatoes, celery, mushrooms, and sometimes peas.

Directions:
Place pot roast in roasting pan, dutch oven, or crock pot and poke meat.  Pour Dales's seasoning over the meat and pour the water over the top and all around.  Add vegetables that take a long time to cook (potatoes, carrots, celery) and turn the crock pot on low for 8-10 hours or high for 4-6 hours.  If you chose to cook it in the oven, follow the directions below:
Cover tightly with foil.  Bake at 400 for 10 minutes.  Then lower oven to 225 and bake for 4-5 hours.

Wednesday, March 10, 2010

Orange Juice Cake - You Gotta Try It!

So, I realize how long it has been since I last posted, and I promised a pot roast recipe, which I do have the pictures of, just haven't gotten it on here.  I will work on that.  This recipe for Orange Juice Cake is wonderful.  It is a favorite amongst the Corsini family.  By Corsini family, I mean Ken, Katie, and Kevin loved this cake growing up, so I consider it an "old" family recipe of my mother-in-laws, Ronna.  For the past 3 years I have made this cake for my mom's birthday because she just isn't a cake-and-frosting kind of girl.  This cake is perfect because it compliments her tea quite well and she loves lemony things.  Honestly, I haven't met anyone who doesn't love this cake.  My one piece of advice:  don't be lazy like me when mixing up the glaze - stir and stir until you get all the powdered sugar dissolved.  It just looks prettier that way!

Orange Juice Cake
Ingredients for Cake:
1 package yellow or lemon cake mix (I like lemon)
1 small package instant lemon pudding
1/2 cup of oil
1 cup of orange juice
4 eggs

Ingredients for Glaze:
2 cups powdered sugar
1/2 cup of orange juice
2 tablespoons of melted butter

Beat all cake mix ingredients together for 2 minutes.  Bake at 350 degrees for 30-35 minutes in a greased oblong pan.  While the cake is baking, mix up the glaze by adding ingredients to a bowl and whisking away until no lumps remain.  After cake is pulled out of the oven take a toothpick and poke every 1 inch or so all around the cake and frost with the glaze while the cake is warm.  You want the cake to cool a little before serving.  Enjoy!

Wednesday, February 10, 2010

They Don't All Have to be Homemade - Mandarin Orange Chicken

If you know me, you know my LOVE for Trader Joe's.  I am there all the time, we know the workers, they all know and love Naomi, it is a bit ridiculous.  I will do a post on "my favorite things" from there.  Then I can feel famous like Oprah.  Maybe I will even do a giveaway or something!?

So tonight for dinner we had Mandarin Orange Chicken - from Trader Joe's.  I saw it yesterday and thought for $4.99 this might be worth a try.  It was WELL worth the try.  We made it for dinner tonight added a few green onions, made some brown rice and garlic green beans to go along with it and wah-la dinner was served.  I could have told Ken that it was from our local take-out place, it was that good.  So, if you have a Trader Joe's nearby try it out, if you don't like it they will give you a refund!

Mandarin Orange Chicken and Garlic Green Beans

To prepare this meal, you just need a package of Mandarin Orange Chicken (I would say it would serve 3 adults) some of their frozen French cut green beans (I am telling you they are the BEST) and some brown rice.  I prepared the brown rice in my rice cooker, basically just steamed it.  For the chicken, saute it in some olive oil in the pan until heated through.  Heat the sauce in a saucepan or in the microwave and then mix it all together.  For the green beans, heat a small amount of oil in a pan.  Add some green beans, salt, pepper, and some crushed garlic.  Cook for about 5 minutes.  

This dinner was together in a snap.  All I had to do was put the rice on earlier so it would be ready with our meal.  Enjoy!!!  

Be on the lookout tomorrow for the best pot roast ever with easy homemade cheddar biscuits.  

Thursday, February 4, 2010

Funfetti Cookies, Who Doesn't Love These?

I honestly do not know what it is about these cookies that people love, but they LOVE them.  It is so simple and whoever thought of making cookies using a cake mix?  These featured cookies were made with a box of Pillsbury Funfetti Cake Mix for a friend's birthday.  Keep in mind you can make any kind of cake mix cookie with the same recipe.  I have made chocolate chocolate chip, I have used a white cake mix and rolled the cookies in cinnamon and sugar, you can use lemon and white chocolate - I am telling you endless possibilities.  I guess I could use a permutation and figure out the number of possibilities, but who wants the boring math stuff?  Onto the recipe!

Funfetti / Cake Mix Cookies

Ingredients:
1 box of cake mix
2 eggs
1/3 cup oil
1 can of frosting and some sprinkles (optional)

Directions:
Heat oven to 375 degrees.  Mix all ingredients together well and drop in one inch round balls on a cookie sheet.  On the box it tells you to squish them down before you bake - but I don't do that and they turn out much more chewy.  Bake for 8-10 minutes or so and let cool before you move them or frost them.

Like I said, I don't know why these are always a hit, but they are!  Try a new flavor today and let me know how you like it!

Wednesday, January 27, 2010

Who Says Kids Won't Eat Their Veggies - Sausage and Eggplant Pasta

My mom is one of those people who is a sucker for those little cookbooks they sell at the cash register in the grocery store.  I regularly find them on her coffee table stuck between her magazines and Sunday paper.  It is one of those things I have always teased her for, then I end up taking them home and using them, and (oops) never returning them.  Good thing we live close.  


She made this dish for me one night when I stayed with them while my husband was away.  It is just one of those comfort foods that taste like home.  Even if you don't like eggplant, I promise you will in this dish.  Our daughter ate every last bite saying, "Mom, this pasta is delicious."  (I wish I could type the inflection in her cute voice.)


Try it, tweak it, see how you like it.  I made some changes to the recipe when I made it for us, just because I had certain things on hand.  This is a great dish to make for a large crowd.  I actually bake one in a small dish for us and then freeze another one for another night.  


Sausage and Eggplant Pasta


Ingredients:

  • 1 package (1 pound) penne pasta (I use brown rice pasta because it has some added nutritional value)
  • 2 pounds bulk Italian sausage (I don't eat a lot of pork and have made this with turkey sausage and those chicken sausage links)
  • 1 medium eggplant, peeled and cubed
  • 1/2 a container of sliced portebella mushrooms
  • 1 large onion, chopped
  • 2 garlic cloves, minced
  • 2 tablespoons olive oil
  • 1 can (28 oz) diced tomatoes, undrained (I used the one seasoned with oregano and basil)
  • 1 6 oz. can of tomato paste
  • 1 teaspoon salt
  • 1 teaspoon dried basil
  • 1 teaspoon paprika
  • 1 15 oz carton of ricotta cheese
  • 4 cups of mozzarella cheese (I only used 2 cups)
Note:  If you don't want to use canned tomatoes + tomato paste a jar of your favorite pasta sauce would work as well!  

Directions:
  1. Cook pasta according to package directions.  Meanwhile, in a large skillet cook sausage over medium heat until no longer pink; drain.  Set sausage aside.
  2. In the same skillet, saute the eggplant, onion, garlic, mushrooms, (could add some green bell pepper) in oil.  You might have to add some oil to the pan because the eggplant soaks it up pretty quick.  Stir in the tomatoes, tomato paste, salt, basil, and paprika; simmer, partially covered for 15 minutes.  Remove from heat.  Drain pasta; stir into eggplant mixture.  Add sausage.
  3. Spread half of the sausage mixture into a 13 by 9 dish.  Spread with ricotta cheese.  Top with half of the mozzarella cheese and remaining sausage mixture.  
  4. Cover and bake at 350 degrees for 40 minutes.  Uncover; sprinkle with remaining cheese.  Bake 5 minutes longer or until cheese is melted.  Let stand for 10 minutes before serving.  
This is comfort food at its best!  Enjoy this with a green salad or steamed broccoli and garlic bread.  Your family will have a new favorite!  

Friday, January 22, 2010

Best. Salsa. Ever.

There is something to be said for simplicity.  This salsa comes from my dear friend, Kimberly, she had us over one night and made it.  My husband, who is a salsa connoisseur, loved it and gave it rave reviews.  This fall I hosted a dinner party for a friend with a Mexican theme, so of course, I had to make this salsa.  I make it regularly ever since and nothing from a jar compares.  This is more like a restaurant style salsa. It was a huge hit.  With our addiction to tortilla chips, it doesn't last long in this house.  It's so easy and worth a try.  Let me know if you do!


Ingredients:
1 28 oz can tom. drained
1 10 oz can Rotel
2-3 small cloves chopped garlic
1/4 cup chopped onion
2-3 teaspoons ground cumin
1/2 tablespoon salt
1 tablespooon sugar (I usually do a teaspoon)
1 cup finely chopped cilantro
Juice of 1/2 lime


Combine in Food processor and blend well.  Be careful not to overblend or it will be too watery.  Enjoy!


Tuesday, January 19, 2010

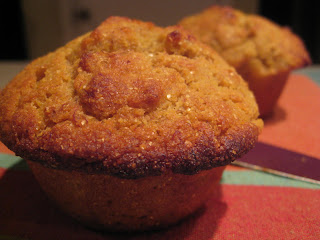
Warm up with ... Three Bean Chili with Banana Cornbread Muffins

Really, it's not that cold here, but I am a sucker for chili and soup.  I just love to make a big pot at the beginning of the week so I have leftovers for lunch.  So, last night, I made it a Meatless Monday and made this Three Bean Chili that I saw in Cooking Light magazine.  I don't like to cook different things for us and our daughter, so I learned a trick.  If I wrap anything up in a tortilla she eats it.  She calls it a "turrito."  So, Naomi enjoyed a "turrito" with the chili in the middle with some cheese sprinkled on top.

I also made these wonderful banana cornbread muffins to go along with our chili.  I will include both of the recipes.

Happy Dinner!!!

Three Bean Vegetarian Chili


Ingredients:

  • 2 red bell peppers
  • 3 tablespoons EVOO
  • 1 cup chopped onion
  • 2 teaspoons ground cumin
  • 1 teaspoon crushed red pepper
  • 1 teaspoon paprika
  • 1/2 teaspoon salt
  • 4 garlic cloves, thinly sliced
  • 2 cups organic vegetable broth
  • 1.5 cups peeled, cubed butternut squash (I cheated and found some frozen)
  • 1 (28oz) can tomatoes, undrained and chopped
  • 1 can each:  pinto, cannellini, and red kidney beans, drained
  • 1/2 cup sliced green onions
Directions:

  1.  Preheat broiler.
  2.  Cut bell peppers in half length wise.  Remove and discard seeds.  Place pepper halves, skin up, on a baking sheet and broil until charred, about 15 minutes.  Place in a ziploc or brown bag and let sit for about 15 minutes so the skins can cool and will peel easily.  Then, peel and chop the peppers to add to the chili.  
  3. Heat a dutch oven over medium-low heat.  Add oil to the pan; swirl to coat.  Add onion, cook until translucent.  Stir in cumin and next 4 ingredients; cook 2 minutes, stirring frequently.  Add bell peppers, broth, squash, and tomatoes; bring to a simmer.  Cook 20 minutes (if you use frozen squash, it doesn't even need 20 minutes).  Add beans, simmer 10-20 minutes to blend flavors.  Sprinkle with green onions on top.  
Best Banana Corn Muffins
This recipe is fool-proof and goes great with a variety of meals.


Ingredients:
  • 3/4 cup freshly milled flour (or whole-wheat flour)
  • 3/4 cup freshly milled corn meal (or corn meal from a package)
  • 3/4 tsp. salt
  • 2 1/2 teaspoons of baking powder
  • 3/4 cup milk
  • 2 Tablespoons of honey
  • 1 egg
  • 2-3 Tablespoons of melted butter (or a little bit of olive oil, if you are lazy like me)
  • 2-3 ripe mashed bananas
Combine the dry ingredients.  Add milk, honey, egg, and melted butter.  Mix well.  Bake in a greased muffin pan at 425 for about 10-12 minutes.  You can also use all corn meal, but the result is a little bit drier.  

Honestly, if you don't want to go through this trouble, you can always add some ripe bananas to a box of jiffy corn muffins.  I think it would turn out just as good!

Enjoy!

Thursday, January 14, 2010

Add Some Spice to Your Life: Chicken Coconut Curry Soup

You'll be singing, "There's a party in my tummy, so yummy, so yummy" after trying this one (If you have a toddler at home you understand this reference :)).  It was wonderful.  I think magic happens when you mix curry and coconut milk.  I am not a master at the task as of yet, but I am working on it.  I have learned, if you use curry paste, rather than curry powder, your dinner is exponentially better (how's that from a math teacher, I wonder if my former students read this and roll their eyes .... probably).  I use a brand called, Patak's.  I know that there are others, but this one tastes great.  I use it for a variety of recipes and it is worth every penny.  Just be sure to refrigerate it after opening.  Here is a picture of the label of the curry paste and from the coconut milk I used:

    
Yes, the coconut milk is from one of my favorite stores on earth, Trader Joe's.  I think we keep them in business and we are a family of three.  We are there every week, at least once. Their products are great.

Thai flavors are one of my husband's favorite, so I decided to surprise him tonight with this one.  He gave it some rave reviews.  So, if you are feeling a little brave, try this one on a cold night.  I served this with some fresh bread and a mixed greens salad.

Chicken Coconut Curry Soup


Ingredients:
2 tablespoons olive oil
2 carrots peeled and finely chopped
1/2 an onion chopped finely
1 red bell pepper, chopped finely
1 cup chopped chicken meat (white or dark meat)
1 cup cooked brown rice
2 tablespoons red curry paste (such as Patak's, although I think I added 3)
3 tablespoons brown sugar
14 oz. can of coconut milk (I am sure if you buy the full fat it is extra creamy)
2 cans of chicken broth (warning, if you buy low sodium you will want to add salt to this)
cilantro, for garnish (optional)

Directions:
In a dutch oven, heat olive oil with onions, carrots, and red bell pepper.  Cook about 5 minutes until the onions are translucent.  Add the chicken, rice, curry paste and brown sugar.  Stir until well blended.  At this point, the mixture will be pretty thick.  Slowly add the chicken stock loosening any brown bits from the pan and then add the coconut milk.  Simmer for 15-20 minutes and serve hot.

Pretty easy for a weeknight meal, especially if you cook some of this ahead of time.  I usually cook up a bunch of chicken early in the week and then use it throughout in different dishes.  This saves on prep time and won't allow me to make any excuses!  I hate throwing away food.  I found this recipe at Sweet Savory Life, and followed it almost exactly.  She said you can add fish sauce, and some other garnishes but I didn't mess with all that.

Tuesday, January 12, 2010

Chicken Again? Try this new one, Apple-Spinach Chicken!

So it's a new year and everyone is trying to eat healthier, shed a few pounds, add veggies to their diet, etc., etc., etc..  Eating chicken every night of the week can be boring.  This recipe is a not-so-boring approach to chicken.  Definitely worth a try and most ingredients are probably on hand.  It is quick and easy to cook and can be easily doubled or cut in half.  My husband's first response was, "This one is a keeper."  Let me know what your family thinks!

Apple-Spinach Chicken


Ingredients:

  • 2 teaspoons oil
  • 4 (4-ounce) skinless, boneless chicken breast halves
  • 1/4 teaspoon salt
  • 1/4 teaspoon black pepper
  • 1 garlic clove minced
  • 1 tablespoon spicy brown mustard
  • 1/2 cup apple cider
  • 1 medium Granny Smith apple, cored and sliced
  • 6 cups baby spinach or chopped Swiss chard
Directions:
  1. Heat oil in a large nonstick skillet over medium-high heat.  Sprinkle chicken with salt and pepper, and add to skillet.  Cook 5-6 minutes on each side or until well browned.  Remove to plate, and keep warm.
  2. Add next 4 ingredients (through apple slices) to pan; bring to a boil.  Reduce heat, simmer, stirring often, 5 minutes.  Return chicken and juices to pan.  Cook, stirring occasionally, until sauce thickens and the chicken is cooked through, about 3 minutes.
  3. Add spinach to the pan, and toss until wilted, about 1 minute.  Serve hot.  
For the calorie counters 1 serving is a chicken breast and 1/2 cup apple mixture - 202 calories, and worth every one!

I served this over brown rice pasta (my personal favorite) mixed with a little bit of olive oil and parmesan cheese.

Sunday, January 10, 2010

Tex-Mex Bean Burgers with Tomato Salsa, Basically a Homemade Veggie Burger with Kick!

For the past few years we have implemented "Meatless Mondays" and I have tried to find some decent vegetarian meals to incorporate for dinner.  Our daughter is not much of a meat eater, but she LOVES beans.  Loves is an understatement.  That said, a lot of our meals incorporate a lot of beans.  We have a few favorite "bean burger" recipes around here.  This is one that I made last week for dinner.  It is from Cooking Light, May 2007.  It is tweaked just a little bit so it would not be too spicy.  I know you might be reluctant to try this - especially if your husband is joining you for dinner - but mine loved them and never has complained.  We did not put ours on buns, simply because we didn't have any around, and I used black beans instead of pinto beans, and I used an avocado that we had to make a dip on top.  I mean, we couldn't get out of the house since there was 1/4 inch of snow on the ground - that is how we do it here in Georgia.  I have made them before with pinto beans, and we liked them that way as well.  These can be served with some Mexican rice, or some baked sweet potato fries.  We served ours on some greens with a little bit of balsamic vinegar and olive oil on top.  

Tex-Mex Bean Burgers with Tomato Salsa


Ingredients:


  • 1 cup chopped tomato
  • 1/2 cup chopped red onion
  • 1/4 cup minced fresh cilantro
  • 2 tablespoons minced seeded jalapeño pepper
  • 2 tablespoons fresh lime juice
  • 2 (16-ounce) cans pinto beans (or black beans), drained
  • 4 teaspoons olive oil
  • 2/3 cup minced fresh onion
  • 4 garlic cloves, minced
  • 2 teaspoons ground coriander
  • 4 teaspoons all-purpose flour
  • 3 teaspoons ground cumin
  • 1/4 teaspoon salt
  • 1/2 teaspoon pepper
  • Cooking spray
  • 3/4 cup (3 ounces) shredded reduced-fat Monterey Jack cheese
  • 6 (1 1/2-ounce) hamburger buns

Directions:


Combine first 5 ingredients in a bowl. Stir well; set aside. (Or just use some good bottled salsa.)


Place pinto beans in a bowl. Partially mash with a fork, and set aside. Heat oil in a medium nonstick skillet over medium-high heat. Add onion and garlic; sauté 3 minutes or until tender. Add coriander, flour, cumin, salt, and pepper; cook 1 minute, stirring constantly. Add onion mixture to beans, and stir well. Cut 6 (4-inch) squares of wax paper. Divide bean mixture into 6 equal portions, shaping into 3 1/2-inch patties on a wax paper square.


Preheat broiler.
Invert patties onto a baking sheet coated with cooking spray; remove wax paper squares. Broil patties 4 minutes. Carefully turn patties over, and sprinkle with cheese. Broil an additional minute or until cheese melts. Place patties on bottom halves of buns; top each with 1/4 cup salsa and top half of bun.


Thursday, January 7, 2010

Homemade Granola Bars ... First time for the First Post!

I have always loved cooking. Wait, that is not really true. I liked cooking when I got married, but it was really a chore. While I was teaching, it satisfied our hunger. Now, I truly LOVE to cook and make healthy food for my family and friends. I have tried to change our eating habits in the house. Not to say that all we eat is good for you, but if we make it at home I want it to have some sort of nutritional value.

So, all that said, I love to snack. I love to eat snacks. I could eat snacks all day and never have a meal. So I decided to try to make granola bars. It was just a trial that ended really well. I just can't make them, or have them around all the time. Darn temptation.

I hope you enjoy this recipe. I took two recipes and changed the ingredients and methods to gain what worked for us. I hope you decide to try them for your family!

Ingredients:

  • 2 cups oats
  • 3/4 cup wheat germ (I added ground flaxseed instead)
  • 2 tbsp sesame seeds
  • 4 tsp of pumpkin and sunflower seeds, 1 tbsp of millet (or use all sunflower seeds, just whatever is around)
  • 1 cup chopped walnuts (or any nuts you like)
  • 2/3 cup brown sugar (I used sucanat)
  • 1/2 cup honey
  • 4 Tbsp butter (I used coconut oil and some canola, this gave it a chewier texture, the butter made a crunchier bar)
  • 2 tsp vanilla extract
  • 1/2 tsp Kosher salt
  • approximately 8 oz. dried fruit (raisins, craisins, etc.)
  • 1 tsp of cinnamon, optional


Directions:
1. Mix the nuts, oats, wheat germ, seeds in a baking dish with sides. Toast them in the oven for 10-12 minutes, stirring every few minutes so that they don’t get burned.


2. Prepare a glass baking dish (about 11 x 13 inches) for your granola by lining it with waxed paper lightly sprayed with a nonstick spray.

3. Put the brown sugar, honey, butter, vanilla, and salt into a saucepan and bring to a simmer, stirring constantly.


4. By now, your grains and nuts should be toasted, so mix everything together in a large bowl. The grains, the liquid and the dried fruit.


5. Pour the mixture into the lined pan and press together. It helps if you put a piece of wax paper on the top and press it down. Let it sit on the counter to cool for a couple of hours. Then turn it out onto a cutting board and cut into large or small pieces. You can wrap them individually, or put them in an airtight container.

And now they are done!  Enjoy!


Happy Baking!